Reporting Continuing Education
Instructions for Continuing Education Upload on Connect
Step 1: Log in to your CBA Connect account and scroll down to the Continuing Education section of your CBA Connect dashboard.Step 2: Click on the green button that says “Upload CE Data File.”

Step 3: Download the CE Data Template File to your computer. The CE Data Template file will go to your “Downloads” folder. You may wish to save it in a different location on your computer.

Step 4: The CE Data Template File will open to the “Read Me!” tab (shown below). Please read and become familiar with the instructions on how to complete the CE Course Worksheet tab.
***The red arrow shows the two tabs of the spreadsheet. “Read me!” has the instructions. “CE Course Worksheet” is where you will fill in your CE information.

Step 5: Begin filling out the CE Course Worksheet tab.
Row 1 of the spreadsheet (pictured below) is the heading row, which indicates the data that should be populated in each column. The heading row is highlighted in green. Please begin adding your information in row 2.
***Do not add extra columns or CE totals***

Note: Columns C (License Type), G (Year), H (Subject Area), and J (Presentation Method), require you to choose from the drop-down options. See example below.

Helpful Tips:
- The name you enter on the CE Data File Template must match your name as it appears in CBA Connect. Example: If your name is Michael but you signed up with CBA Connect under the name Mike, your CE Data File Template must say Mike.
- Your first name, last name, license type, and CPA number must be filled out for each row that contains CE information. CBA Connect will not attribute your CE to your account if this information is not provided.
- If your license number contains a letter, do not add the letter to the CE Data File Template.
- There is a 150-character limit on the Name of Provider and Course Title columns.
- Course titles and provider names that are copied from an Adobe PDF document into the CE Data File Template may contain punctuation, symbols, and special characters that are not recognized by Microsoft Excel. Please delete these from your course titles.
The following is a non-exhaustive list of characters that tend to be unrecognized by Microsoft Excel when pasted from Adobe PDFs: ampersand, number symbol, exclamation point, percent symbol, parenthesis, dashes, back/forward slashes, and question marks. - The Approval Number column is only for Regulatory Review Courses. Please leave it blank for non-Regulatory Review courses. If you did not complete Regulatory Review for the current renewal cycle, please do not add the course to the file.
- If a course was completed over several days, put the last date in the “Date Completed” column. Do not enter a date range.
-
Hours claimed must in one-hour (1.0), one half hour (0.5), or one fifth of an hour (0.2) increments.
Please note most courses must be a minimum of one hour (1.0) in length. There are two exceptions:
1. Interactive self-study courses can be a minimum of one-half hour (0.5) in length.
2. Nano courses can be a minimum of one fifth hour (0.2) in length.
Step 7: Return to the CE section of your CBA Connect dashboard. You may need to click on the “Upload CE Data File” button again. Next, upload the file to your CBA profile by either dragging the file to the “Document” box (indicated by a red arrow below), or clicking on the “Document” box and selecting the file from your computer drive. Once your file is noted in the box, click “Start Upload.”

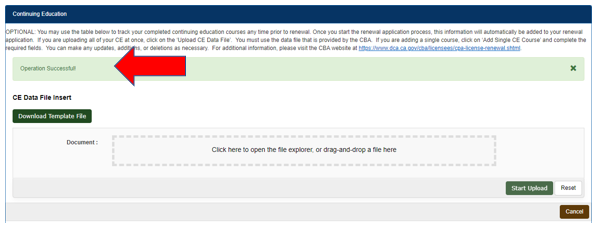
If your CE is uploaded successfully, a green “Operation Successful” message box (shown below) will appear. CE that has been successfully uploaded will be displayed on your CBA Connect dashboard. Please review the CE on your dashboard to ensure accuracy before submitting your renewal application.

Errors in the CE Data File Template
If any errors exist, a red error message will appear (shown below) and an Excel document will download to your computer. You may find the file in your “Downloads” folder. The Excel document will contain an error report listing the courses that did not upload to your CBA Connect dashboard. The cells that contain an error will be highlighted in red.

The cells highlighted in red will need to be corrected before the courses can be successfully uploaded to CBA Connect. Please refer to the Helpful Tips section of this document and the “Read Me!” tab of the CE Data File Template to identify and correct any errors.
Once all the red-highlighted cells on the excel worksheet are corrected, save the document to your computer, and upload it to CBA Connect as explained in Step 7. If the upload is successful, you will receive a green “Operation Successful” message and the courses will be added to your CBA Connect dashboard.
If you continue to receive error messages, you may wish to enter the missing courses manually by clicking on the “Add Single CE Course” button on your CBA Connect dashboard.

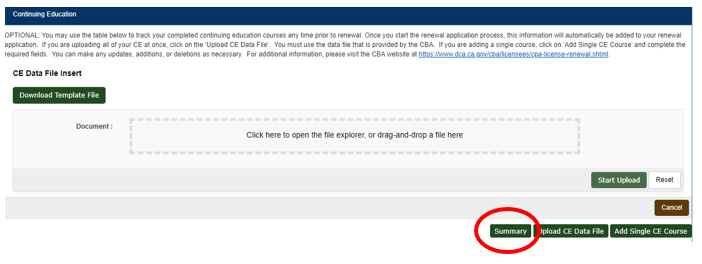
Reviewing CE on the CBA Connect Dashboard Once your CE has been successfully uploaded to your CBA Connect dashboard, you may check to ensure you have met all your CE requirements by clicking on the “Summary” button.

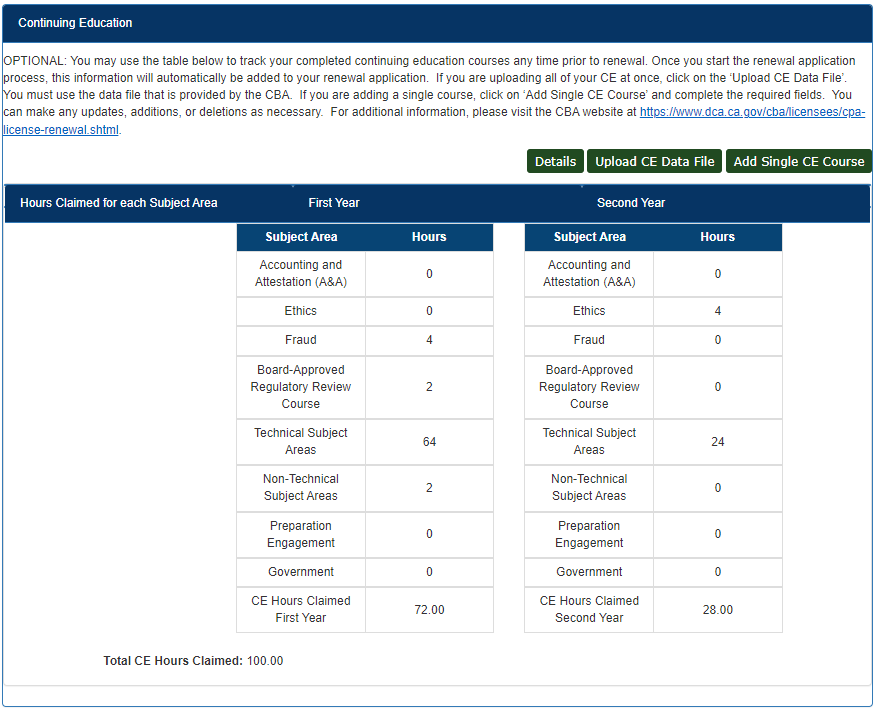
An example of a CE summary page is shown below:

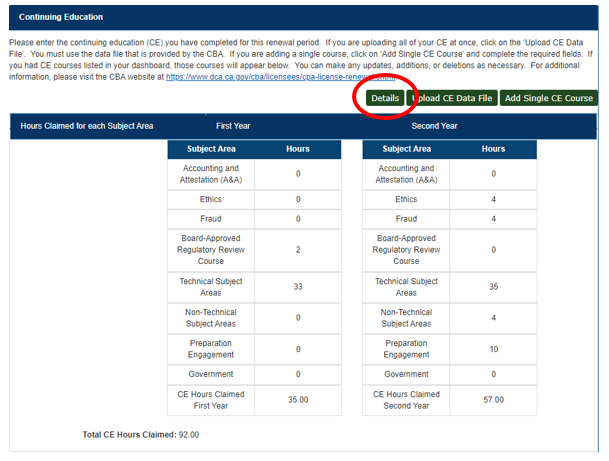
To return to the CE details from the Summary page, click on the “Details” button.

You may edit any CE courses by clicking on the pencil icon next to a course.

You may delete one or more courses by placing a check mark in the box on the left-hand side of the CE details and then clicking on “Delete Selected.”

The CBA recommends reviewing both the summary and the CE details to make sure you have uploaded all your CE and ensured that your courses have been dated correctly and placed in the right year of completion before submitting your renewal application.
Contacting CBA’s Renewal Unit
CBA staff are available to assist you with troubleshooting errors on your CE Data File Template. If you have reviewed the “Read Me!” tab on the CE Data File Template and require further assistance, CBA staff are best equipped to provide meaningful help if the CE Data File Template is emailed to the CBA. Please email your CE Data File Template to renewalinfo@cba.ca.gov with a request for assistance. Please allow up to 3 business days for a response.
CBA staff can also be reached by telephone at 916-561-1704.
Please note that CE must be entered into CBA Connect to be included in your renewal records. It is the responsibility of the licensee to ensure that all CE is entered into Connect correctly before submission of the renewal application. CBA staff are not responsible for uploading your CE into your CBA Connect dashboard. Should CBA staff upload CE on your behalf, you are responsible for ensuring the information is true and correct.
Licensee Quick Hits
Upcoming Events

